The complete route
One controlled workflow from plan to production
- PlanChatGPT
- StartGitHub template
- BuildCodex locally
- ApproveCommit, then push
- DeployCloudflare Pages
The reusable starter supplies the structure and safeguards. Each new website becomes its own GitHub repository and local Codex project. Codex edits and tests locally, but a person reviews the diff and separately approves the commit and push. Cloudflare deploys automatically only after the approved commit reaches main.
1 · Prerequisites and software
Prepare the Windows 11 PC
You need a Windows 11 user account with permission to install applications, a GitHub account, a Cloudflare account, and these desktop tools:
- Git for Windows, which provides Git and Git Credential Manager.
- GitHub Desktop, used to sign in, clone repositories and see repository state visually.
- Codex, used to work on a selected local repository.
- A web browser for GitHub, Cloudflare and the deployed site.
Keep credentials out of the repository. Never paste passwords, access tokens, private keys or account IDs into HTML, project documentation or tracked configuration files.
2 · Git for Windows
Install the version-control foundation
- Download and run Git for Windows.
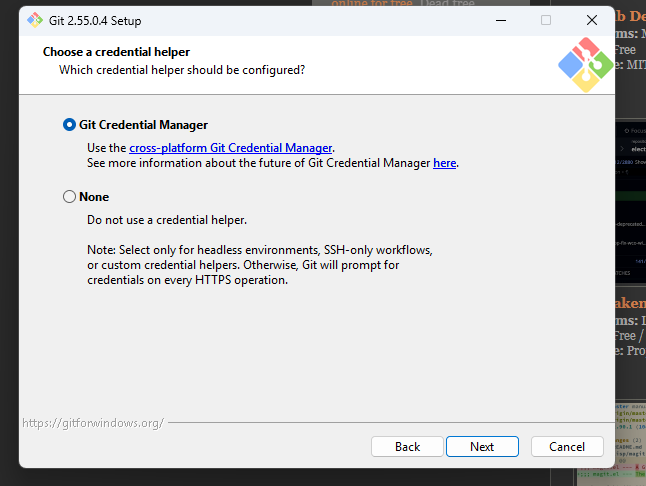
- Complete the installer using the normal Windows integration and Git Credential Manager options.
- After installation, open a new PowerShell window so Git is available to desktop tools.
- Confirm that Git can run before adding repositories.
3 · GitHub Desktop
Install, sign in and connect GitHub
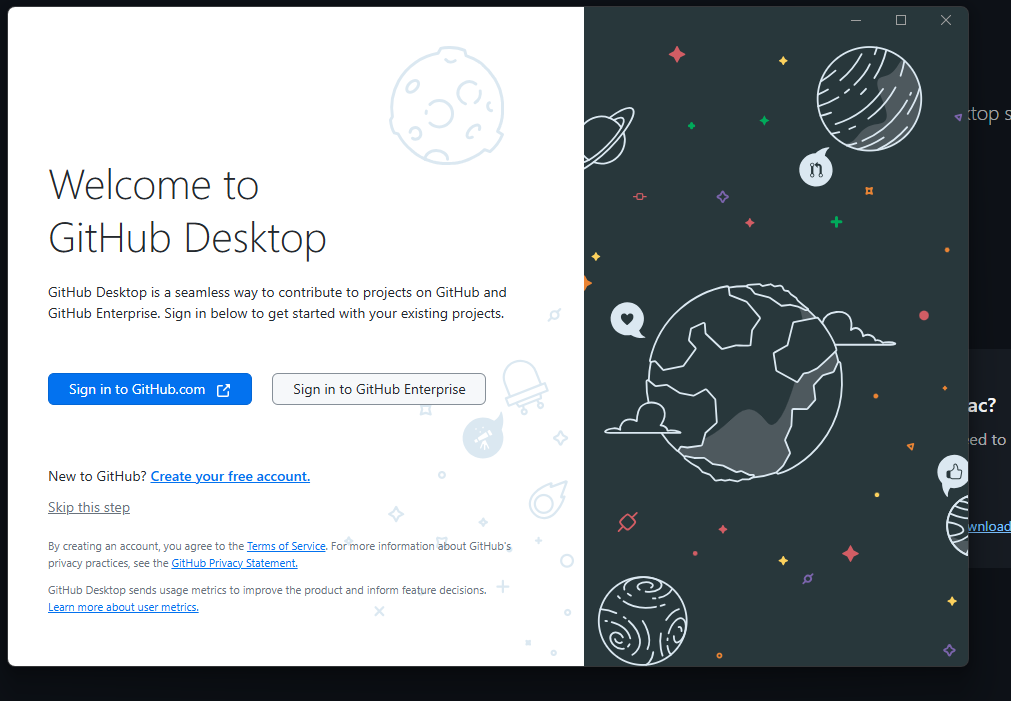
- Install GitHub Desktop and sign in with the GitHub account that owns or can access the repositories.
- Complete the browser-based authorisation when GitHub Desktop requests it.
- Check that GitHub Desktop shows the correct account before cloning or creating a repository.
GitHub Desktop and Git Credential Manager handle authentication without placing a password or token in the project files.
4 · Local workspace
Create C:\GitHub
Create C:\GitHub once and use it as the parent directory for website repositories. Each repository gets its own folder, for example C:\GitHub\website-starter and C:\GitHub\website-test.
Keeping repositories together makes them easy to find in GitHub Desktop and Codex. Do not nest one Git repository inside another.
5 · Reusable foundation
Create the website-starter repository
The starter is a dependency-free static website built from plain HTML, CSS and JavaScript. Its public files live under public/, while instructions and planning documents remain outside the deployed directory.
- Create or clone
website-starteratC:\GitHub\website-starter. - Keep the base homepage, responsive styles, mobile navigation and example page generic enough to reuse.
- Add the repository documents described in the next section.
- Preview and review the starter before approving its first commit and push.
6 · Repository structure
Know what each file controls
public/contains the only files Cloudflare Pages publishes: HTML, CSS, JavaScript, images and other public assets.AGENTS.mddefines mandatory instructions for Codex and other coding agents, including the commit and push approval gates.PROJECT.mdrecords the project purpose, audience, scope and deployment decisions.README.mdexplains how to start, preview and customise the static website.WORKFLOW.mdprovides the detailed review, GitHub, Cloudflare Pages, domain and release checklist.
Keeping repository documents outside public/ prevents them from being included in the deployed site.
7 · GitHub template
Make website-starter reusable
- Open the
website-starterrepository on GitHub. - Open the repository settings and enable the Template repository option.
- Return to the repository page and confirm the template action is available.
A template creates a fresh repository with the starter files but without treating the new website as a continuation of the starter’s Git history.
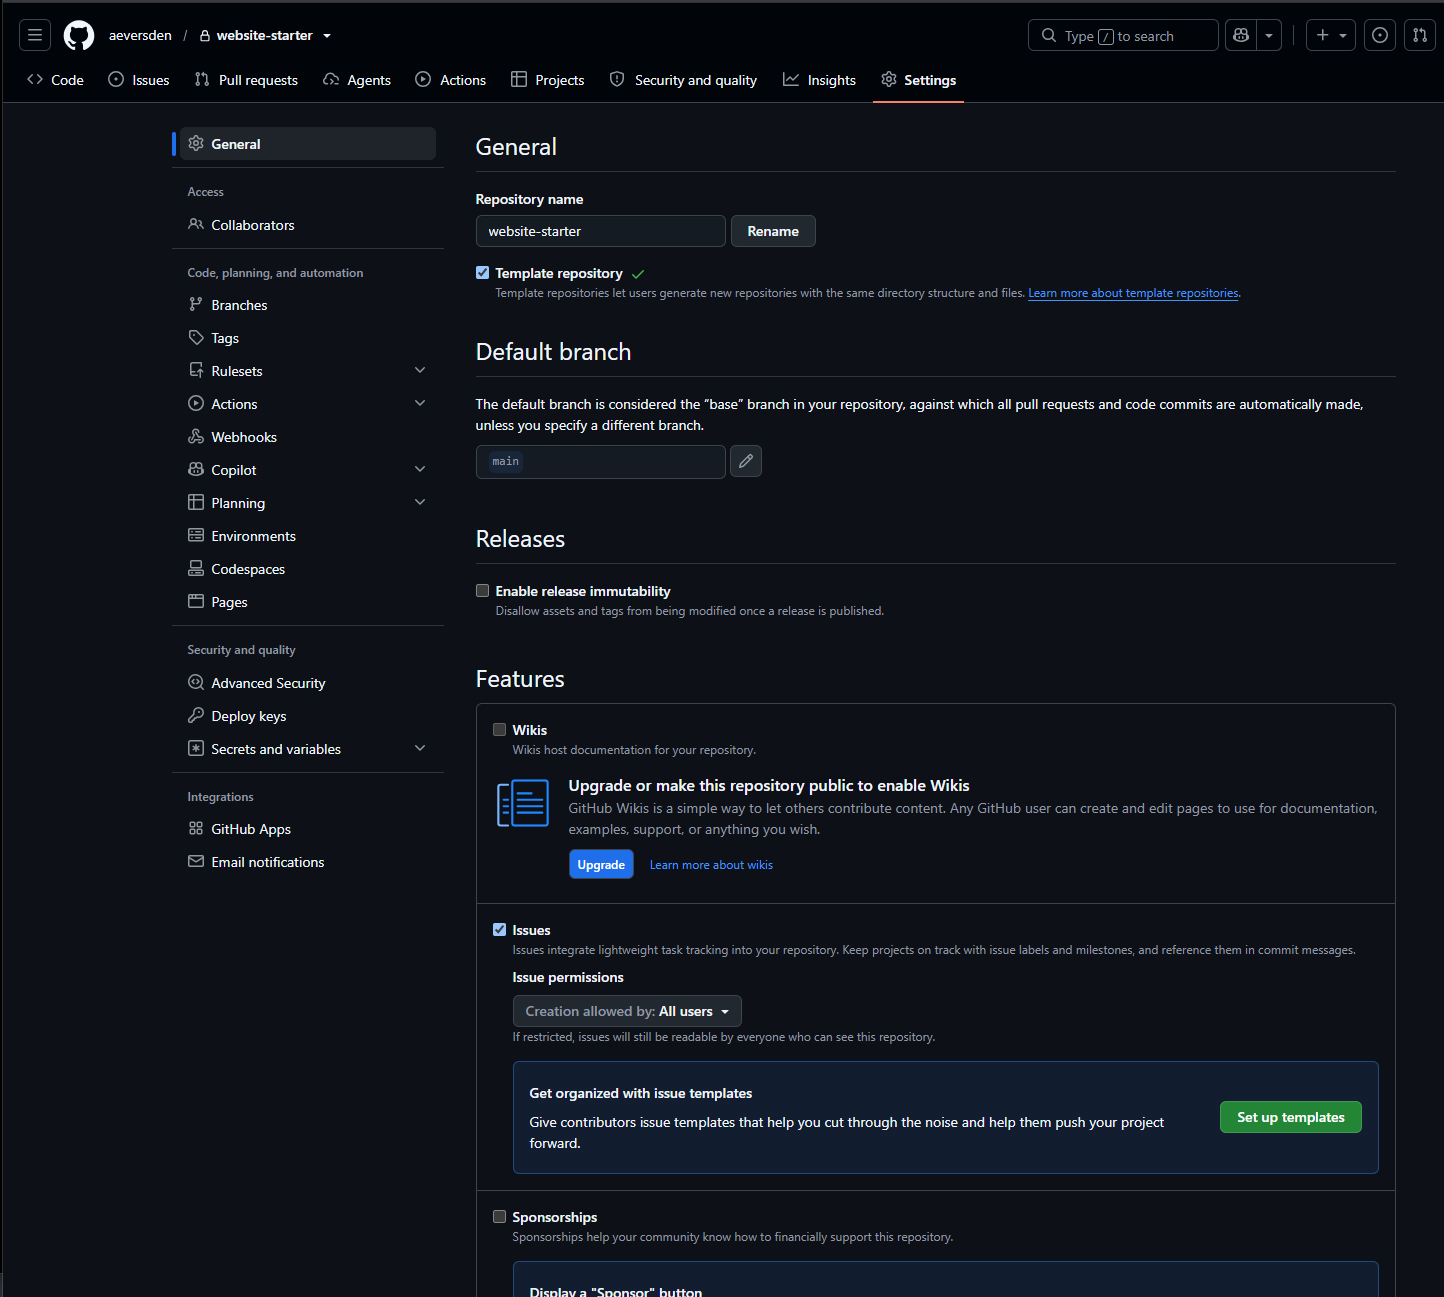
main.8 · New repository
Create a website from the template
- Use the template action on
website-starter. - Choose the GitHub owner, repository name and visibility.
- Create the repository, then check that the starter files are present on
main. - Keep private repositories private unless the website’s source is intended to be public.
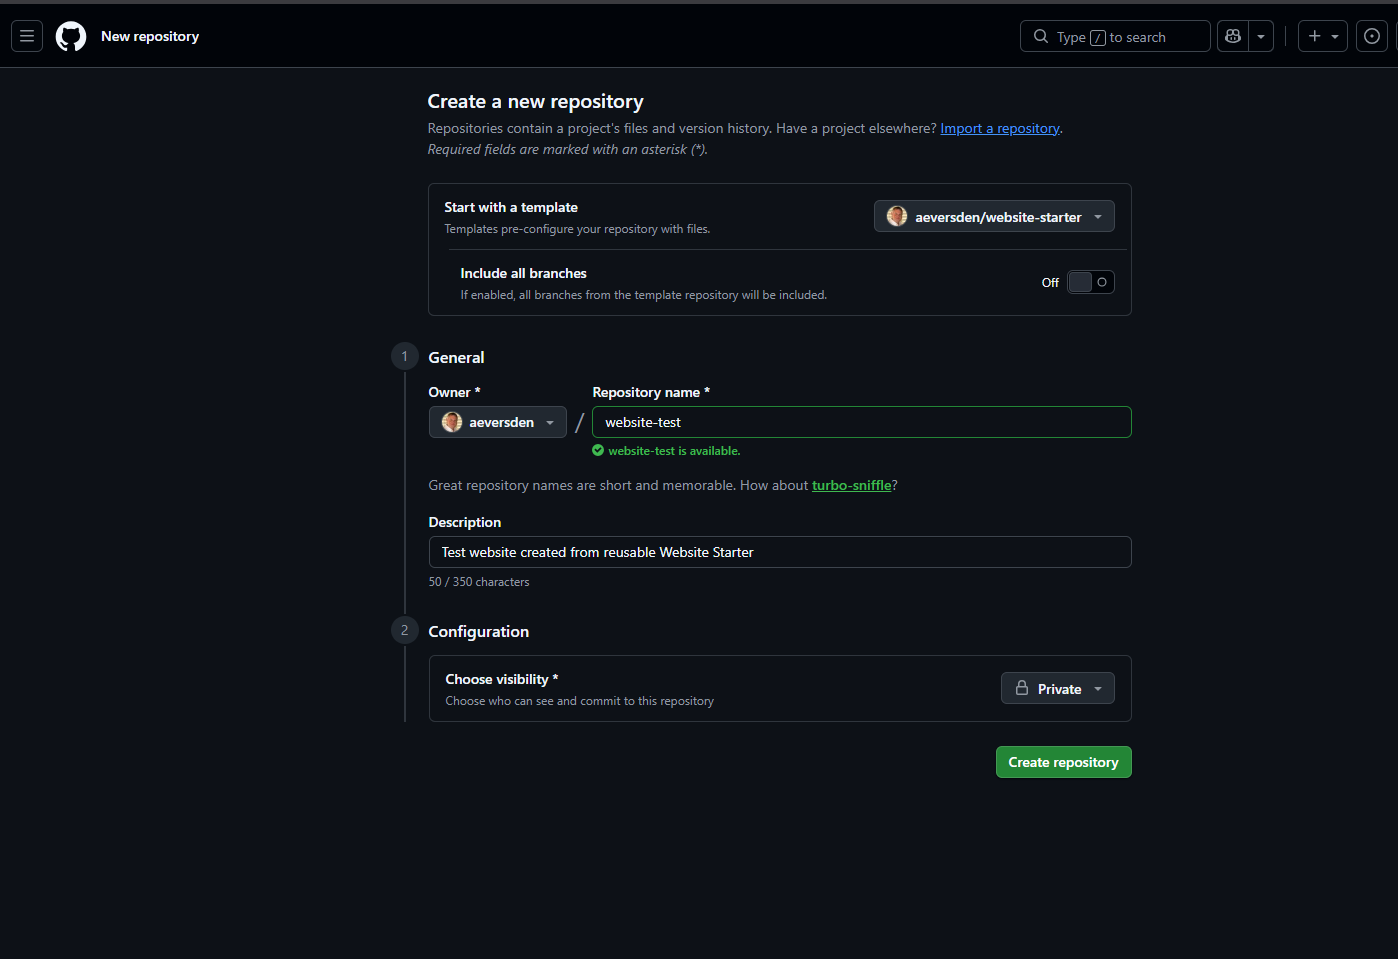
website-test repository is based on website-starter and set to Private before creation.9 · Local clone
Clone the new repository to C:\GitHub
- In GitHub Desktop, choose the new repository from your GitHub account.
- Set the local path to
C:\GitHub\<repository-name>. - Clone it and confirm GitHub Desktop shows the
mainbranch with no local changes.
10 · Codex project
Add the local repository to Codex
- Open Codex and add the cloned repository folder as a project.
- Select the exact folder under
C:\GitHub, not the parent directory containing every repository. - Start a task inside that project and describe the requested website change.
11 · Agent controls
How Codex discovers and follows AGENTS.md
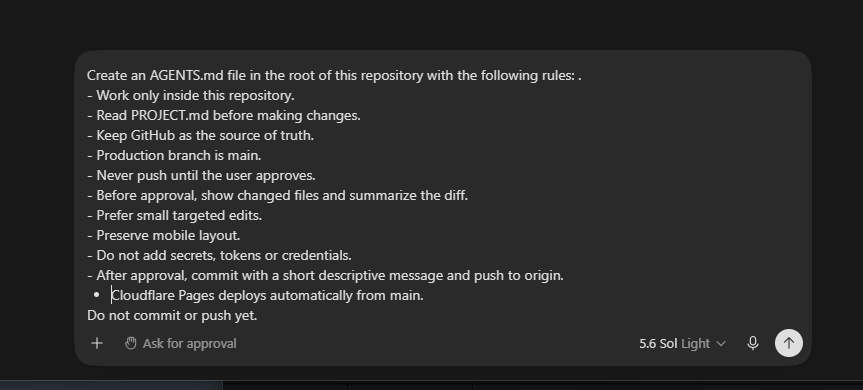
When Codex works inside the repository, it reads the applicable AGENTS.md. This project’s file requires plain static files by default, focused changes, accessible responsive layouts, full verification, and strict Git approval gates.
The important control is separation of authority:
- Approval to edit does not approve a commit.
- Approval to commit does not approve a push.
- Creating repositories, connecting Cloudflare, deploying or changing DNS needs explicit confirmation.
12 · Local work
Edit, test and review before Git operations
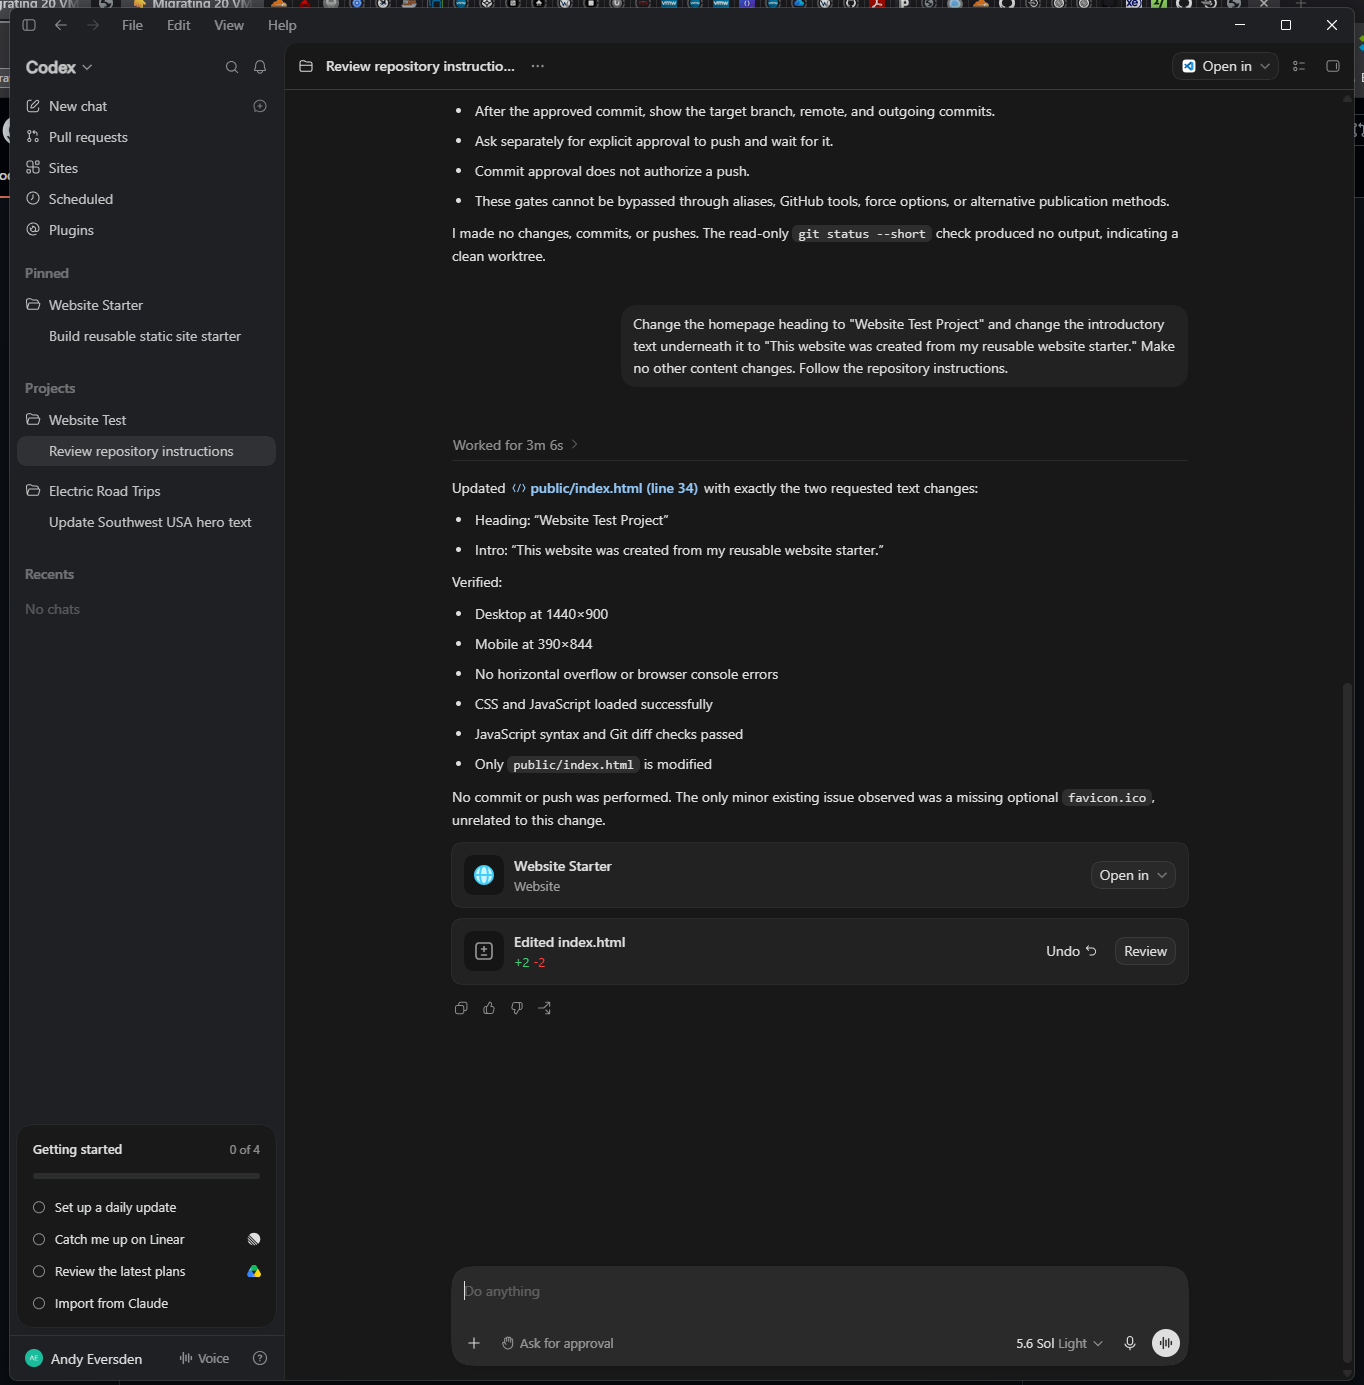
- Ask Codex for a focused change and explicitly state any files or actions that are out of scope.
- Codex edits the local files, checks HTML structure, relative links, stylesheet and script paths, and JavaScript syntax.
- Codex previews the relevant pages and checks desktop and mobile widths.
- Review the changed-file list, complete diff, verification results and any remaining risks.
- Request corrections if anything is wrong. No commit is needed while reviewing local changes.
13 · First approval gate
Approve the reviewed commit separately
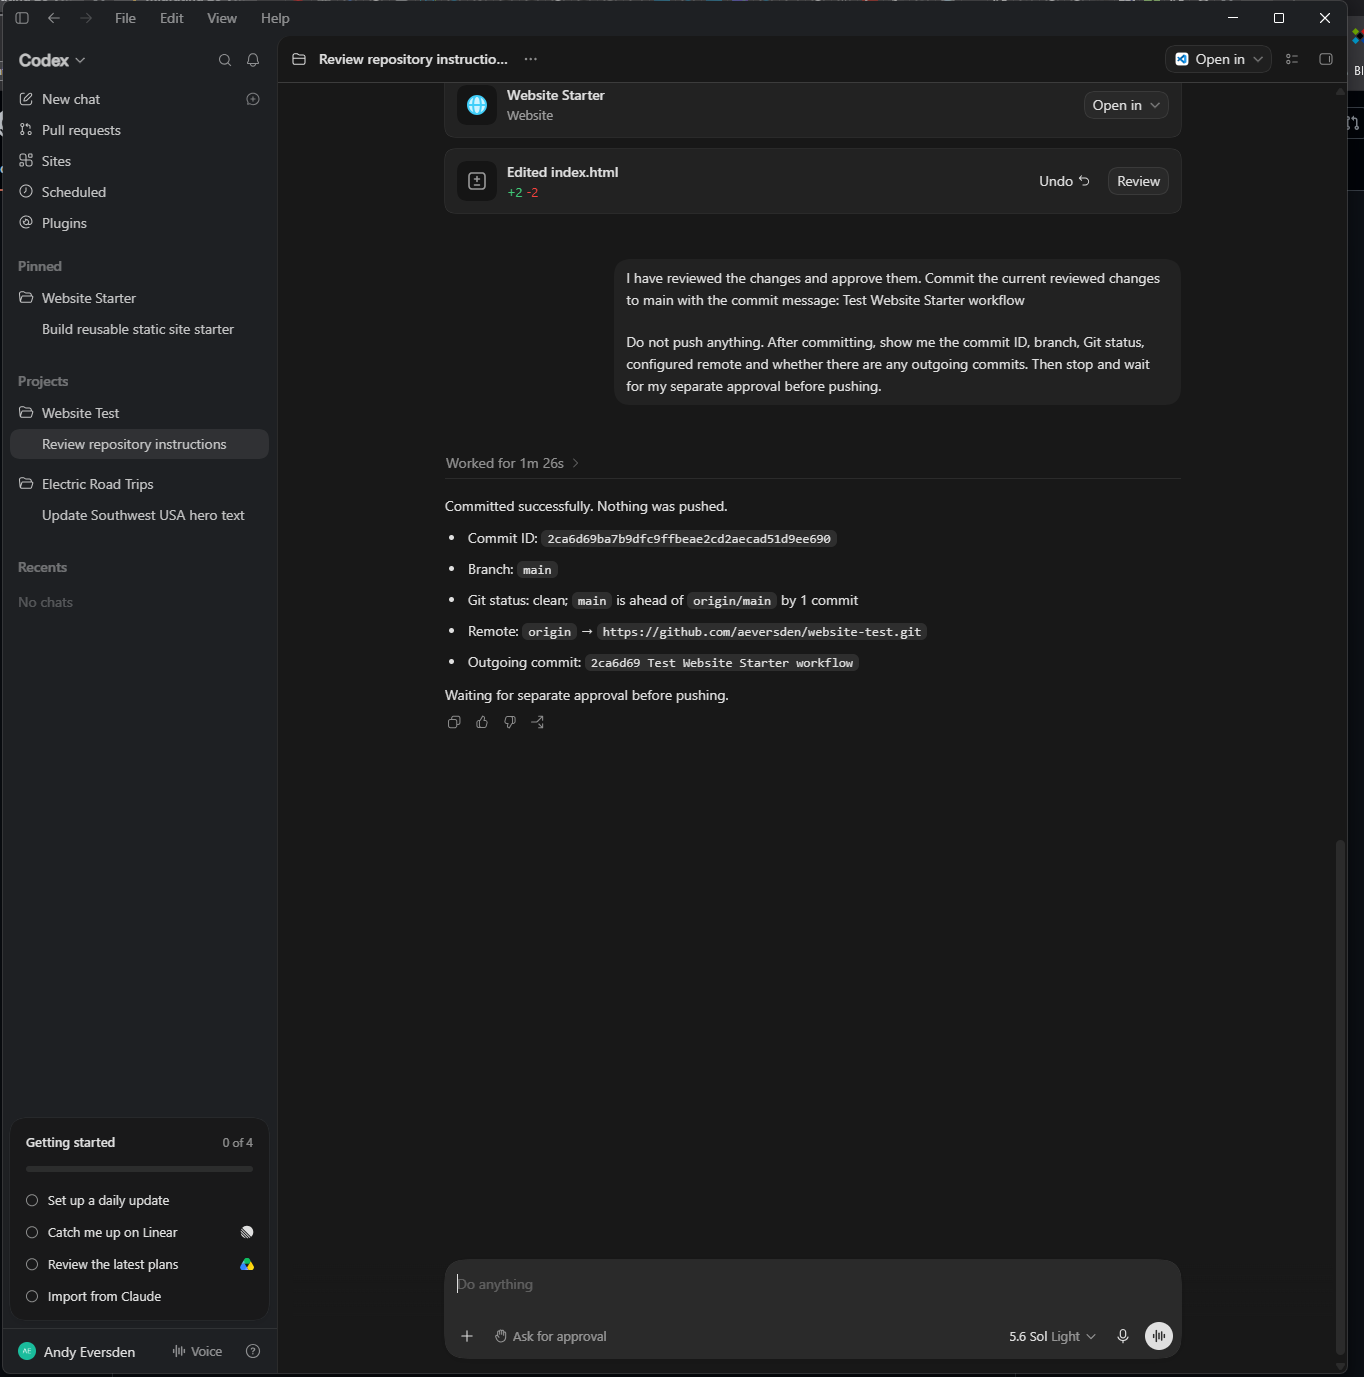
After the local change is correct, give explicit approval to commit the reviewed files and provide the intended commit message. Before committing, Codex checks that the branch, file list and diff still match what you reviewed.
After the commit, Codex reports the commit ID, branch, Git status, configured remote and outgoing commits. It then stops without pushing.
14 · Second approval gate
Approve the push only after inspecting the outgoing commit
Review the reported branch, remote and outgoing commit. Then explicitly approve pushing that existing commit to origin/main. Codex verifies the worktree and outgoing count again before pushing.
Afterward, Codex confirms that the worktree is clean, local main matches origin/main, and no outgoing commits remain.
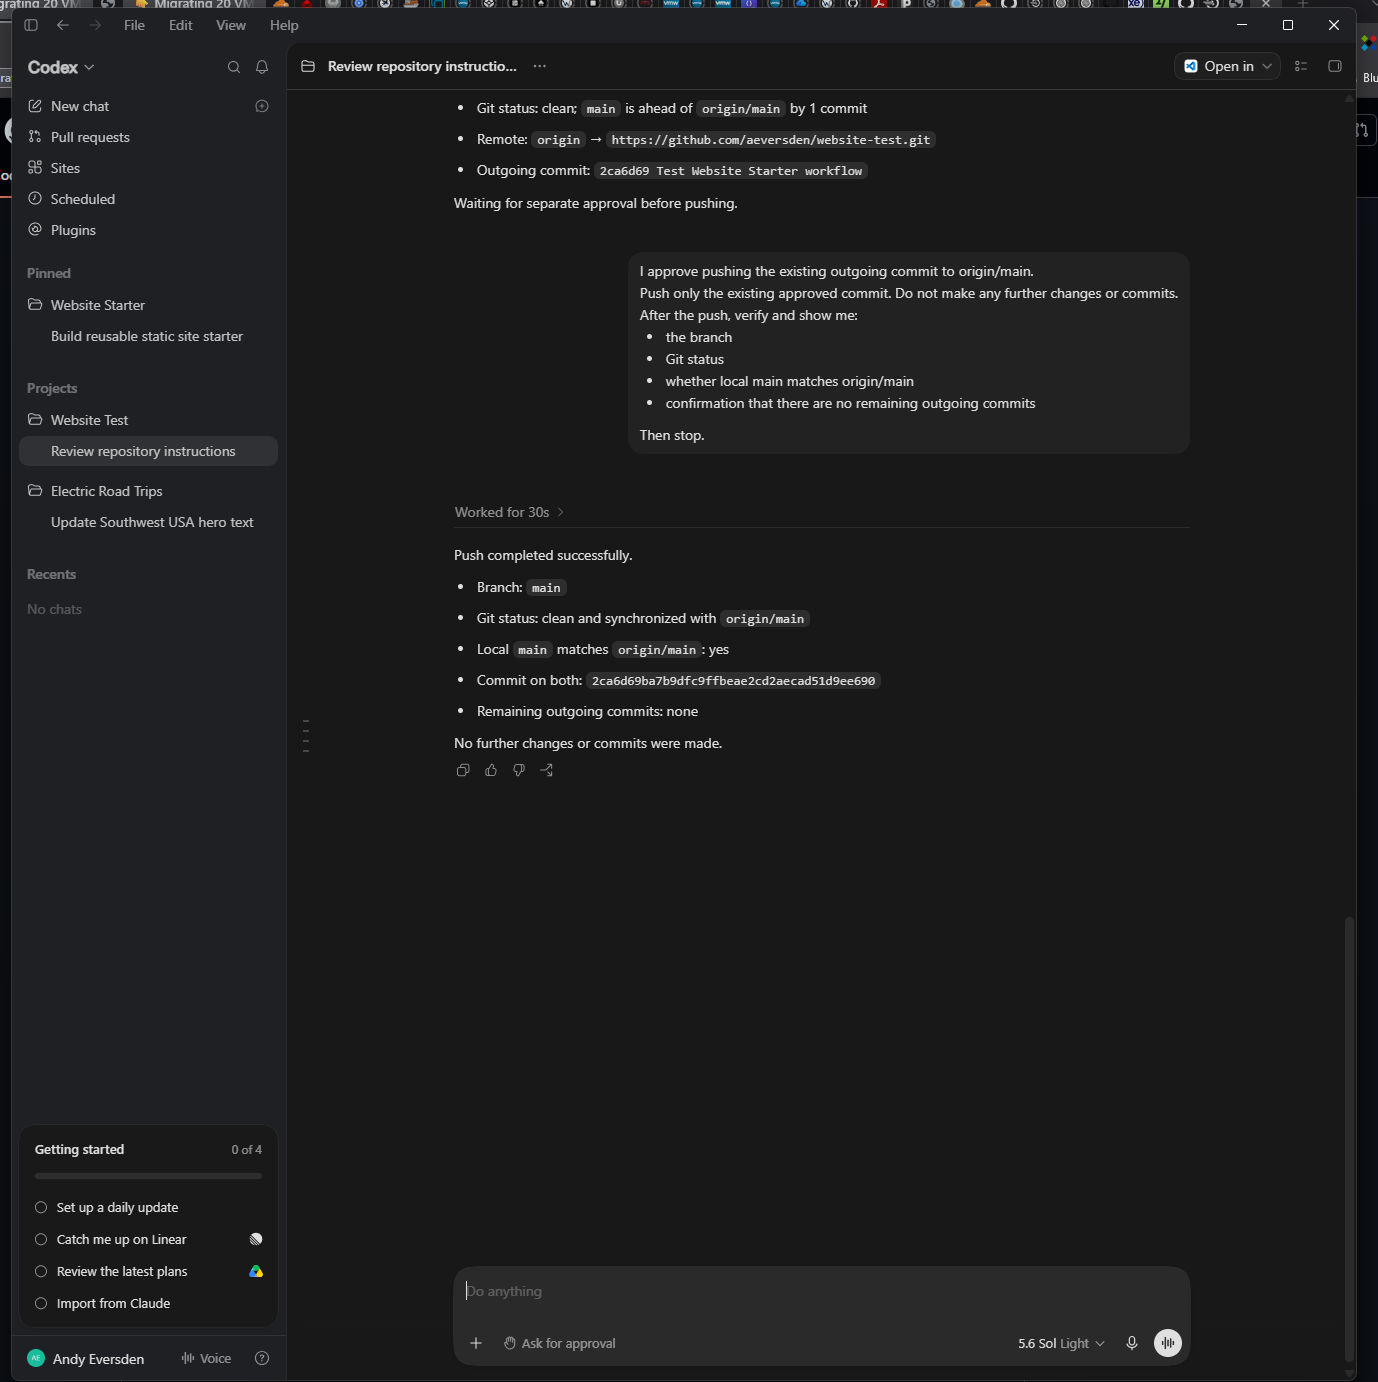
main matches origin/main and no outgoing commits remain.15 · GitHub authentication
Let Git Credential Manager handle credentials
This setup uses an HTTPS GitHub remote and Git Credential Manager. GitHub Desktop or Git can open a browser-based GitHub sign-in when authentication is needed. Complete that sign-in using the account with repository access.
Do not put a GitHub password or personal access token in the remote URL, tracked files, screenshots or Codex prompts.
16 · Git ownership protection
Resolve a Git safe.directory warning carefully
Git may refuse to use a repository when Windows reports that its directory is owned by a different identity. Check that the folder is the expected local repository before trusting it. For the starter repository in this setup, the recorded fix was:
git config --global --add safe.directory C:/GitHub/website-starter
Use the exact path named in Git’s warning for a different trusted repository. Do not add a broad wildcard or mark unrelated folders as safe.
17 · Cloudflare GitHub access
Grant access to the new private repository
When the new repository is private, the Cloudflare GitHub integration must be allowed to see it before Pages can select it.
- Open the GitHub configuration for the Cloudflare integration.
- Grant access to the specific new repository when practical.
- Return to Cloudflare and refresh the repository selection.
- Confirm that the intended repository appears before continuing.
Changing integration permissions affects external access to repository data. Confirm the repository and account before saving the permission change.
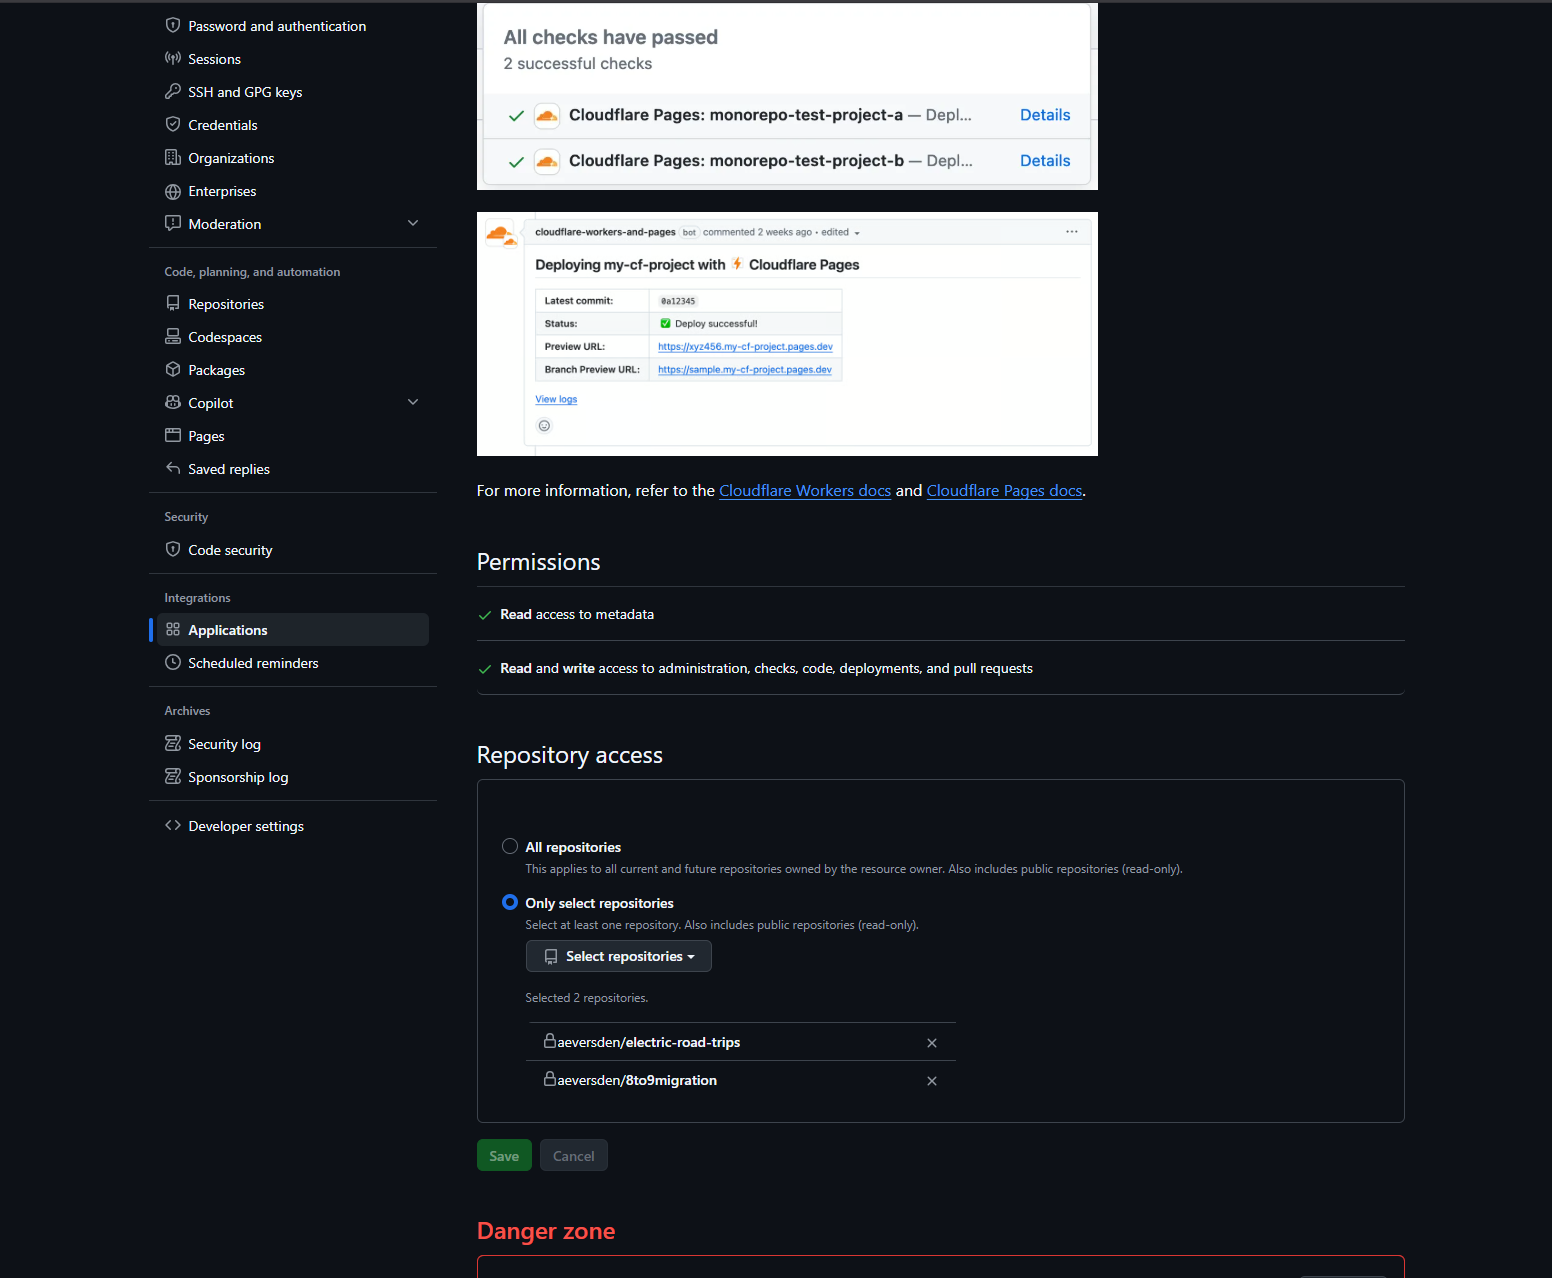
18 · Cloudflare Pages
Create the Pages project
- Open Workers & Pages in Cloudflare and create a Pages project using Git integration.
- Select the GitHub account and the intended repository.
- Confirm that the production branch is
main. - Enter the no-build settings in the next section, then save and deploy.
- Inspect the deployment result and open the generated
pages.devURL.
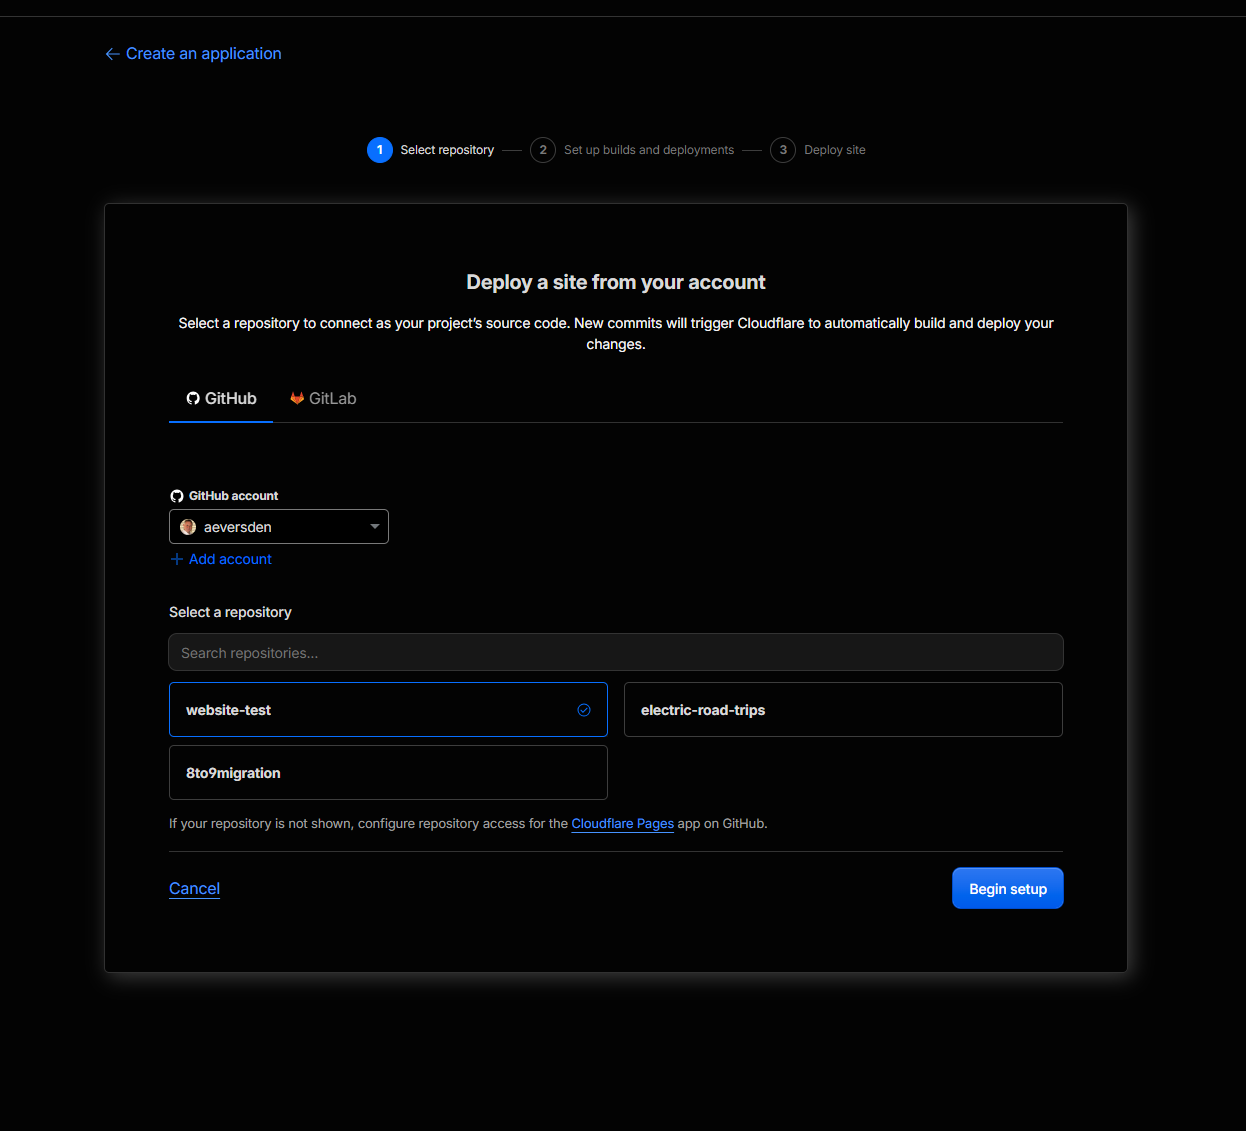
website-test appears in Cloudflare and can be selected as the deployment source.19 · Build configuration
Use the static-site settings
- Production branch
main- Framework preset
- None
- Build command
- Leave blank
- Build output directory
public
There is no package manager, framework or build step. Cloudflare publishes the contents of public/, leaving AGENTS.md, PROJECT.md, README.md and WORKFLOW.md outside the live website.
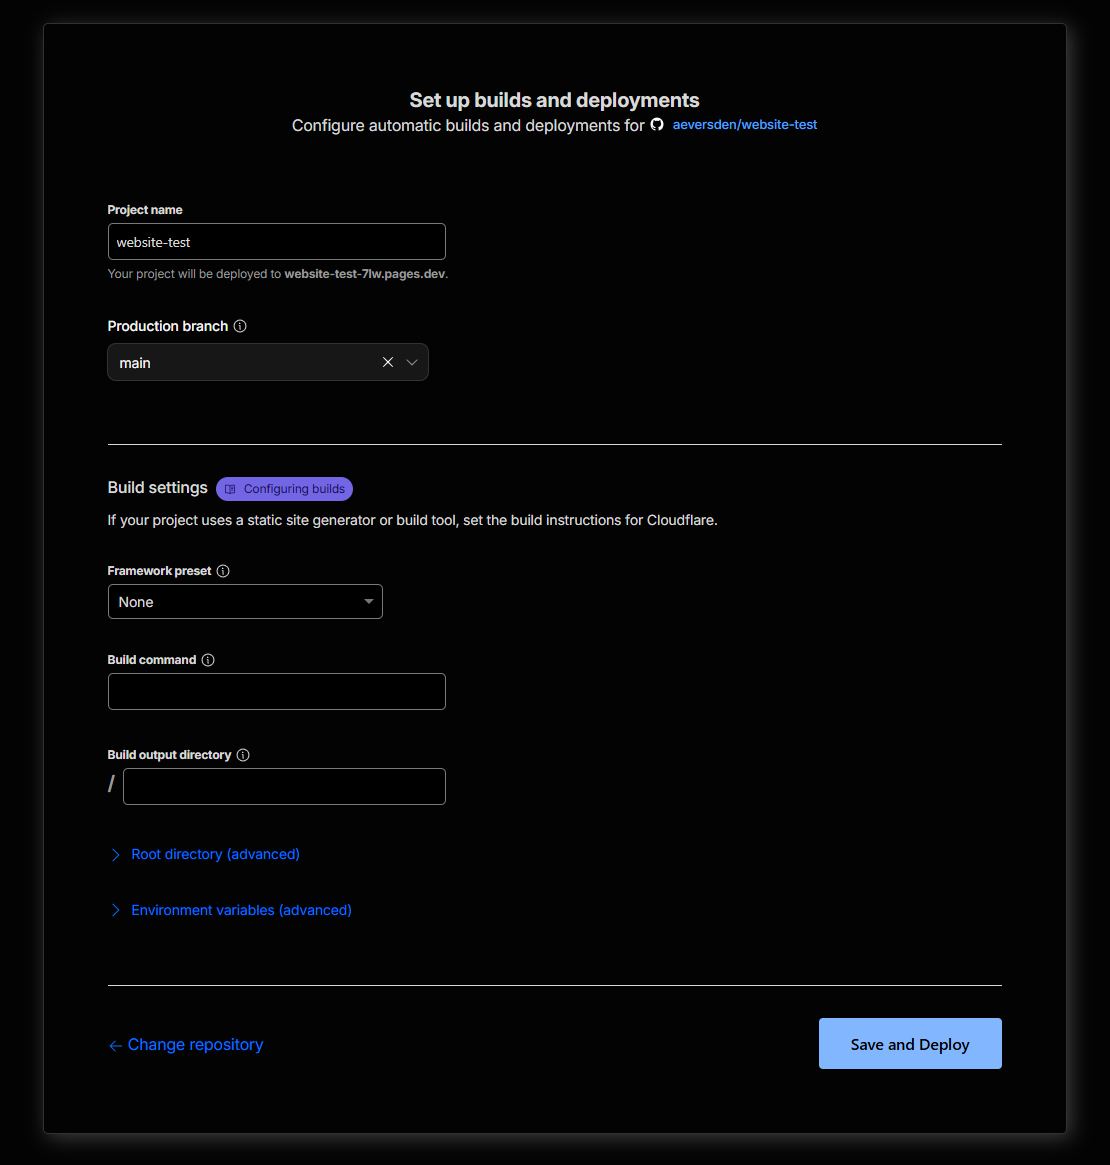
main, Framework preset None, and a blank Build command. The screenshot was taken before public was entered in Build output directory; enter it before selecting Save and Deploy.20 · Ongoing delivery
Approved pushes trigger automatic deployments
Once Pages is connected, the normal cycle is local edit → local test → human review → approved commit → separate approved push. When the approved commit reaches GitHub’s main branch, Cloudflare Pages detects it and starts a production deployment.
Check the deployment status, build log and live page after each release. A successful Git push confirms publication to GitHub, but the Cloudflare deployment is a separate process that must also succeed.
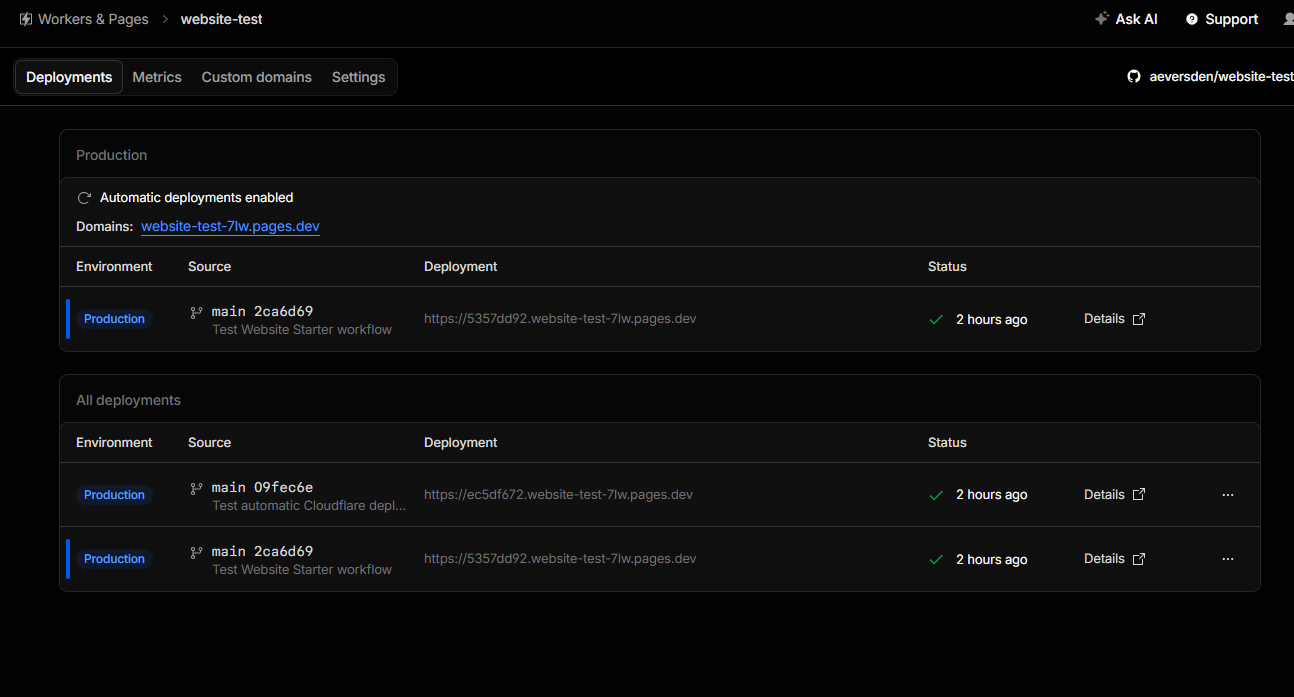
09fec6e, “Test automatic Cloudflare deployment,” after the approved push to main; the green status check confirms success.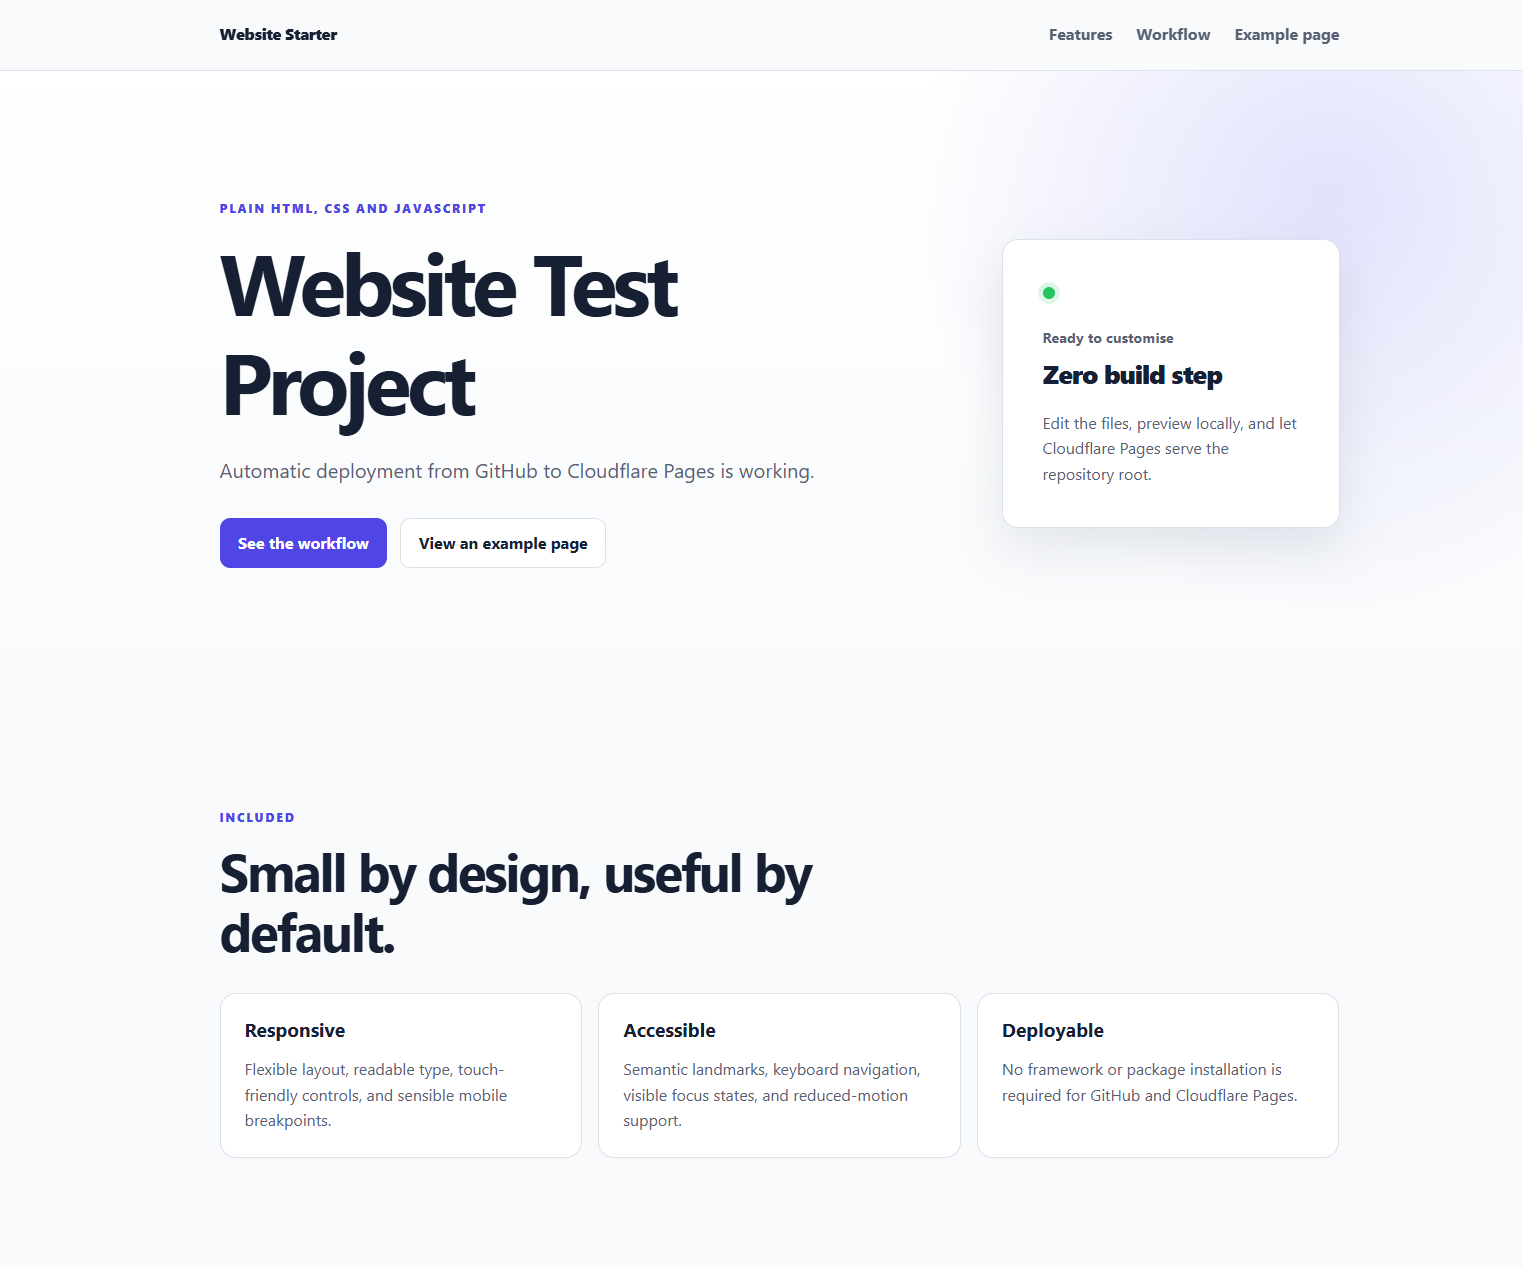
Who does what?
You
- Choose the scope and content.
- Review local changes and diffs.
- Approve commit and push separately.
- Approve repository and Cloudflare permission changes.
- Check the final live result.
Codex
- Read
AGENTS.md. - Edit and test local files.
- Report files, diffs and verification.
- Commit or push only after the matching approval.
- Verify repository state after Git operations.
Cloudflare
- Watch the connected GitHub branch.
- Start a deployment after a push.
- Publish the
publicdirectory. - Provide deployment status, logs and the live URL.
21 · Future websites
Repeat the process without rebuilding the foundation
- Create a new GitHub repository from
website-starter. - Clone it into its own folder under
C:\GitHub. - Add that exact repository folder as a Codex project.
- Update
PROJECT.md, then ask Codex for the website content and design. - Follow the local edit, test, review, commit approval and push approval cycle.
- Grant the Cloudflare GitHub integration access to the new repository if needed.
- Create the Pages project with
main, None, blank andpublicsettings. - Verify the first deployment and every future production update.
23 · Custom domain setup
Connect website-starter.eversden.com to Cloudflare Pages
This setup connects the Cloudflare Pages project website-test to the custom hostname website-starter.eversden.com. The DNS provider is IONOS, so Cloudflare’s My DNS provider method is used.
Add the custom hostname to the Pages project first. Cloudflare must provide and verify the required DNS values. Only then should the matching CNAME record be created at IONOS.
- Open the
website-testproject in Cloudflare Pages and open Custom domains. - Add
website-starter.eversden.comas a custom domain. - Choose My DNS provider when Cloudflare asks how DNS is managed.
- Keep the Cloudflare instructions open and sign in to IONOS.
- Create a CNAME record with name/host
website-starterand targetwebsite-test-7lw.pages.dev, using the values supplied by Cloudflare. - Save the record at IONOS, return to Cloudflare, and wait for DNS verification. DNS changes can take time to propagate.
- Confirm the custom domain status changes to Active.
- Confirm the domain’s SSL status shows SSL enabled before treating the hostname as ready.
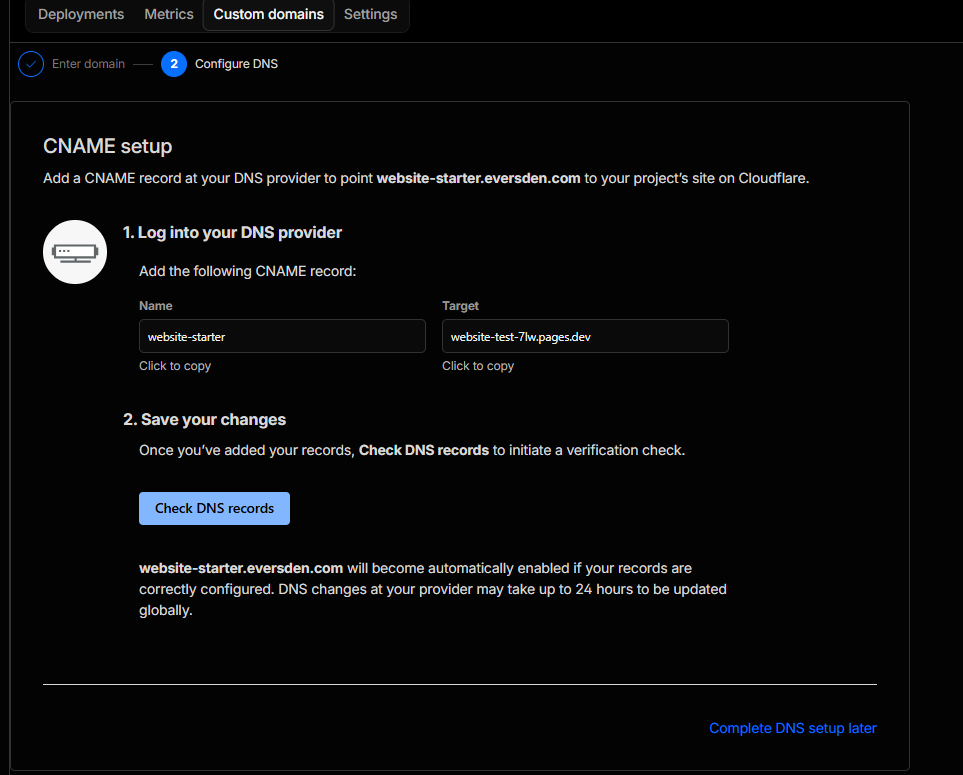
website-starter and target website-test-7lw.pages.dev.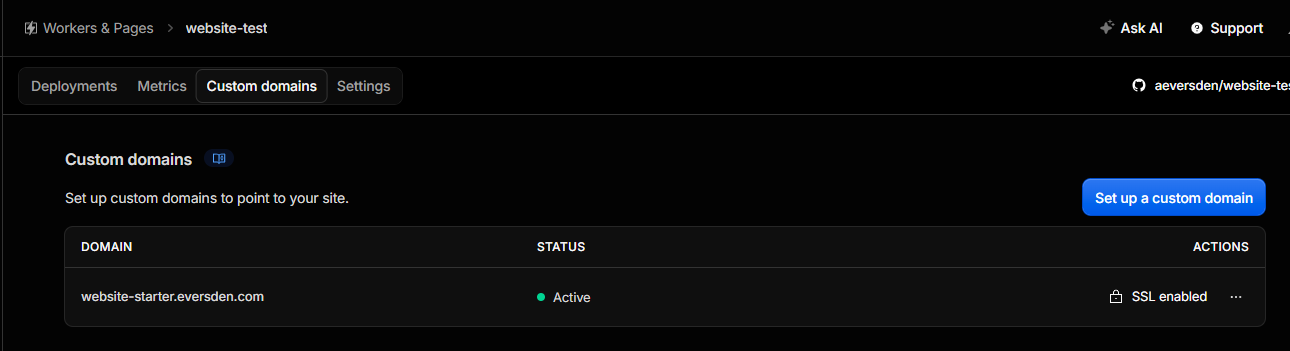
website-starter.eversden.com shows Active and SSL enabled.- Pages project
website-test- Custom hostname
website-starter.eversden.com- DNS provider
- IONOS
- Setup method
- My DNS provider
- CNAME name/host
website-starter- CNAME target
website-test-7lw.pages.dev- Ready state
- Active with SSL enabled
24 · Cloudflare Access and One-time PIN
Protect the custom domain with approved-email sign-in
Cloudflare Access sits in front of the custom hostname and allows only approved email users to continue. The resulting flow is:
website-starter.eversden.com → Cloudflare Access → approved email → one-time PIN → website
- In Cloudflare, go to Zero Trust → Access → Applications.
- Create a Self-hosted application.
- Set the destination/public hostname to
website-starter.eversden.comand leave Path blank so the application covers the whole hostname. - Create an Access policy named Allow approved email users.
- Set Action to Allow and the Include selector to Emails.
- Add the approved email used for this test:
andy@eversden.com. Do not use the Everyone selector. - Set the authentication provider to One-time PIN.
- Turn Accept all available identity providers off.
- Turn Apply instant authentication on.
- Leave Authenticate with Cloudflare One Client off.
- Set the session duration to 24 hours, then save the application and policy.
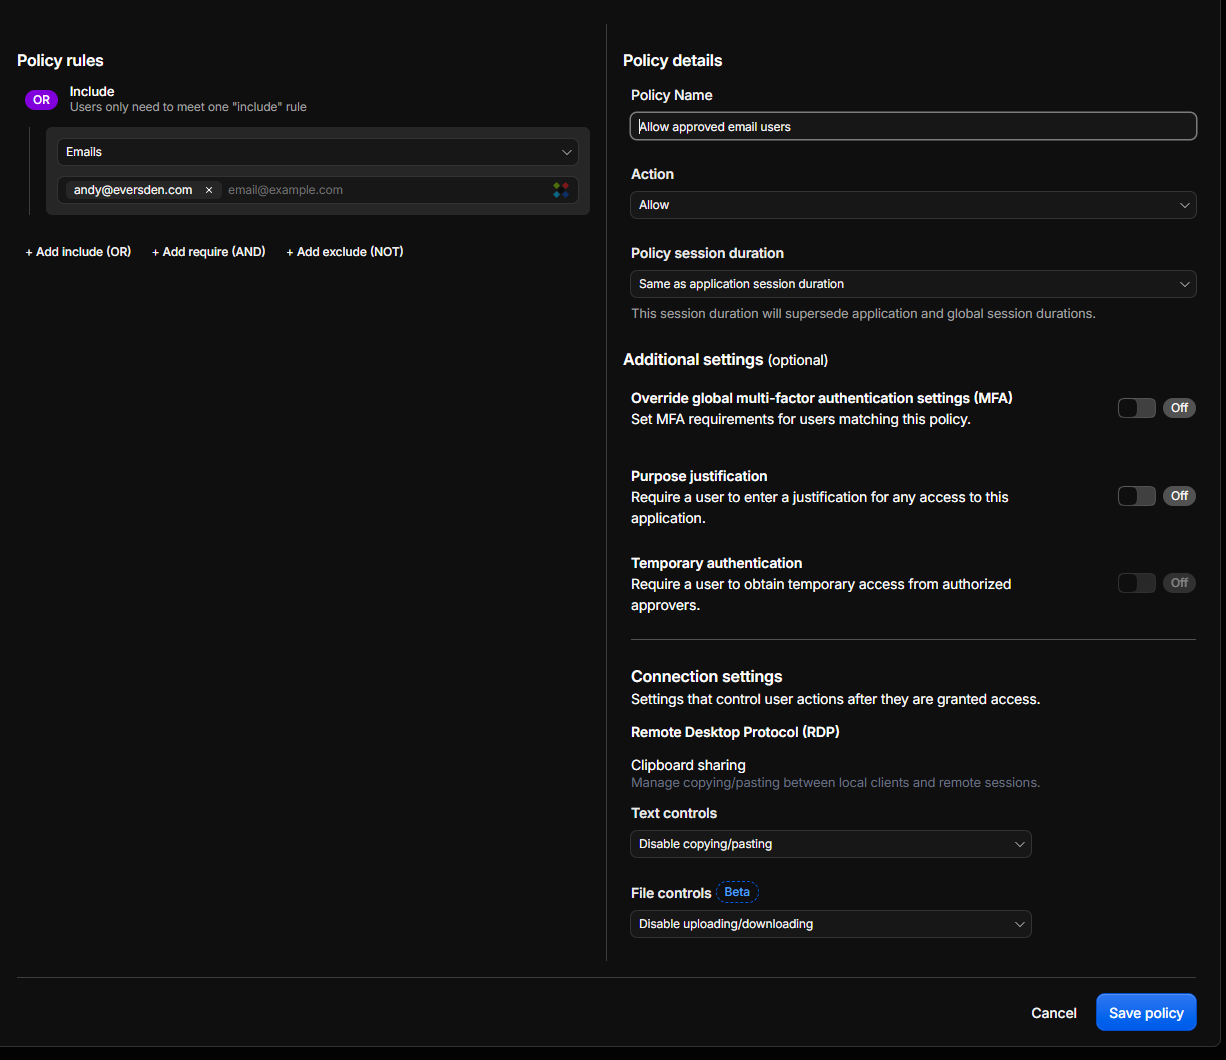
andy@eversden.com—not Everyone.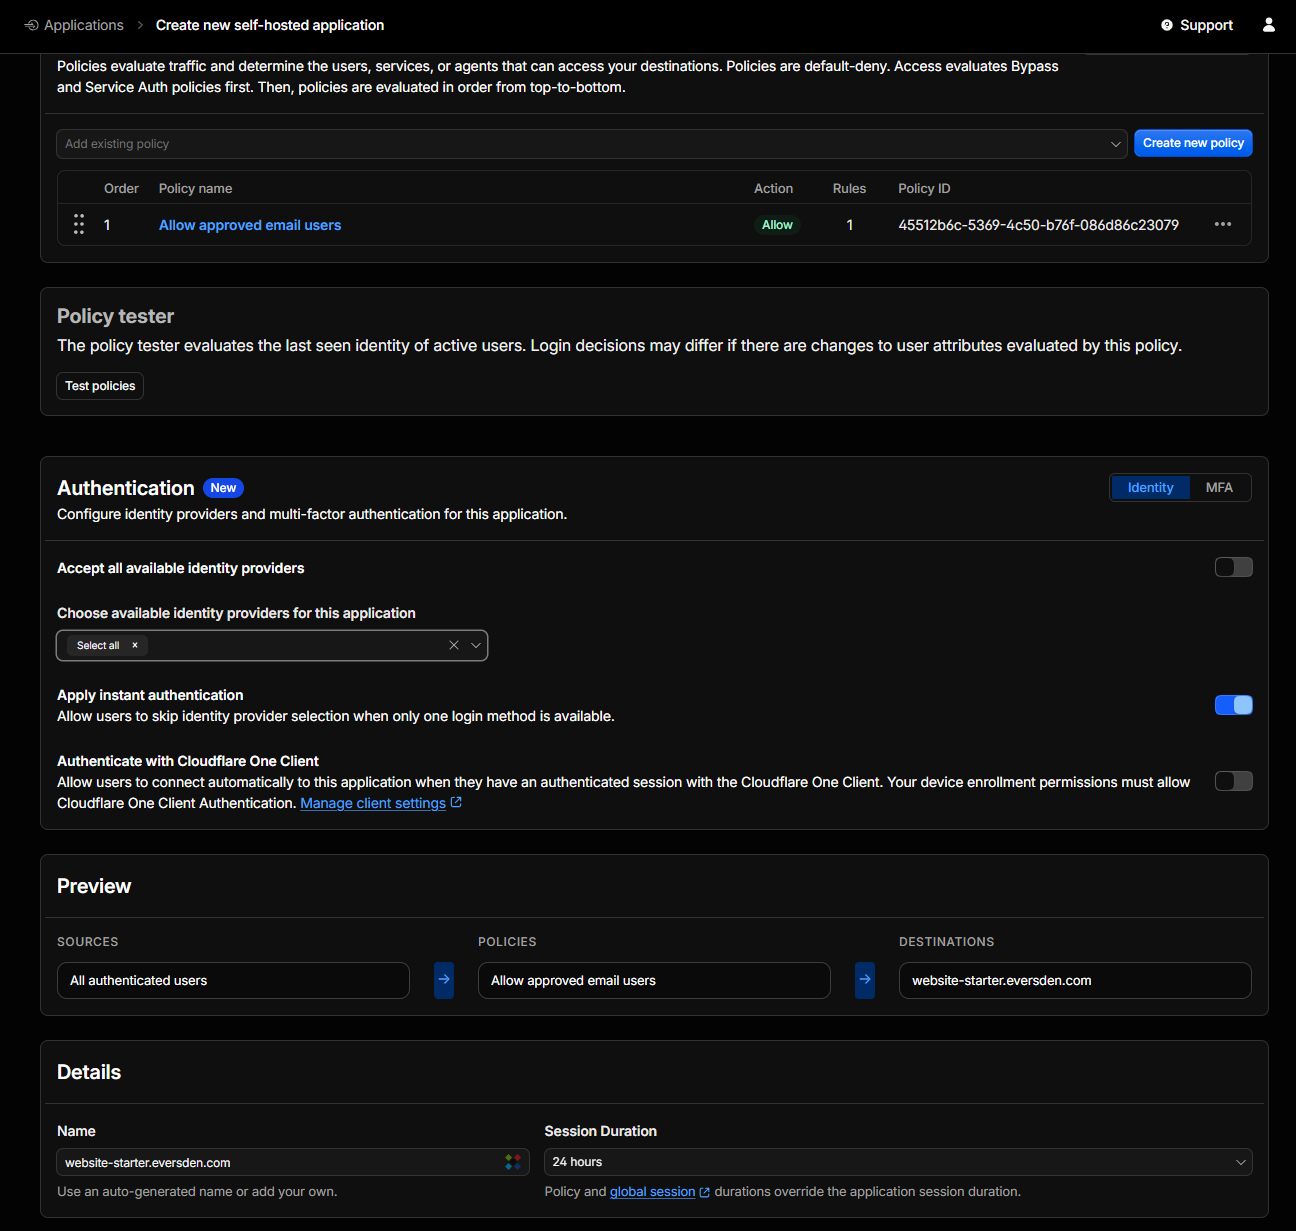
- Application type
- Self-hosted
- Public hostname
website-starter.eversden.com- Path
- Blank
- Policy
- Allow approved email users
- Action
- Allow
- Include selector
- Emails
- Approved test email
andy@eversden.com- Authentication
- One-time PIN
- All identity providers
- Off
- Instant authentication
- On
- Cloudflare One Client
- Off
- Session duration
- 24 hours
Test the protected hostname
- Open a different browser or an InPrivate/Incognito window.
- Browse to
website-starter.eversden.com. - Enter an approved email address.
- Receive the one-time PIN by email and enter it on the Cloudflare Access page.
- Confirm the website loads after authentication.
A browser with an existing valid Cloudflare Access session may go straight into the website without requesting another PIN. This is expected until the Access session expires; use another browser or an InPrivate/Incognito window to confirm that protection is active.
25 · Troubleshooting checklist
Check each boundary in order
- Git is not recognised: finish installing Git for Windows and open a new PowerShell or desktop-app session.
- Git reports dubious ownership: verify the repository folder, then add only that exact trusted path to
safe.directory. - GitHub asks for credentials: complete the Git Credential Manager browser sign-in with the account that can access the repository.
- The repository is missing in Cloudflare: update the Cloudflare GitHub integration so it can access that specific repository, then refresh Cloudflare.
- The wrong files are deployed: confirm the build output directory is
public. - Cloudflare tries to run a build: confirm Framework preset is None and Build command is blank.
- A push does not deploy: confirm the commit reached
origin/main, the Pages production branch ismain, and the project is connected to the correct repository. - The deployment fails: inspect the Pages deployment status and build log before changing settings.
- The live site looks old: compare the deployed commit with the approved GitHub commit, then reload the live page.
- The custom domain is still pending: allow time for DNS propagation, then confirm the CNAME at IONOS still matches the values Cloudflare supplied.
- The CNAME is incorrect: use name/host
website-starterand targetwebsite-test-7lw.pages.dev; do not substitute the full custom hostname in a field where IONOS expects only the host label. - SSL is not active yet: wait for Cloudflare to verify the DNS record and provision the certificate. Do not consider setup complete until the domain shows Active and SSL enabled.
- Access protects the wrong destination: confirm the self-hosted application’s public hostname is exactly
website-starter.eversden.comand its Path is blank. - One-time PIN is not offered: confirm One-time PIN is the configured authentication provider, Accept all available identity providers is off, and Apply instant authentication is on.
- An approved email is denied: confirm the Allow policy uses the Emails selector and includes the exact address, such as
andy@eversden.com; do not replace it with Everyone. - The browser goes straight into the site: an existing valid Cloudflare Access session can bypass another PIN prompt until the 24-hour session expires.
- You need to confirm protection: test in a different browser or an InPrivate/Incognito window, where no existing Access session should be present.
- A screenshot does not appear: place it under
public/images/setup/with the recommended filename, then replace the corresponding placeholder block with a relativeimgelement and descriptive alternative text.
For GitHub or Cloudflare screens whose labels have changed, verify the current official documentation before changing repository permissions or production settings.